Assembling and Shaping Your Tree: Bringing Sophistication to Your Home Decor
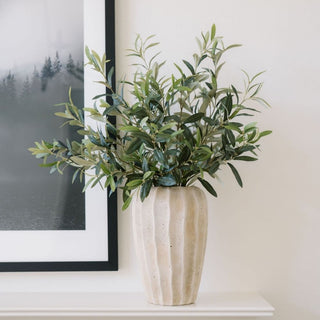
Faux olive trees have gained popularity as a timeless and sophisticated addition to interior décor. With their elegant silvery-green leaves and natural, sculptural look, these trees add a Mediterranean touch to any space. Whether you're placing your faux olive tree in a cozy corner or a grand entryway, learning how to properly assemble and shape your tree will help bring out its best qualities. Here's how to assemble and shape your olive tree for maximum beauty and realism.
Why Choose a Faux Tree?
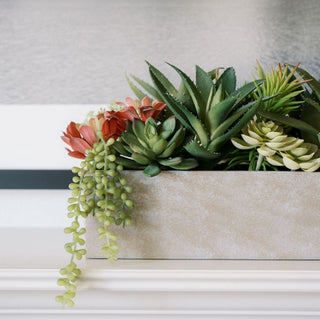
 Trees are a wonderful addition to a space. Take olive trees, for example. Olive trees are symbolic of peace and tranquility, often associated with Mediterranean climates and cultures. A faux olive tree provides all the aesthetic benefits of a real tree, without the need for constant care and attention. No watering, pruning, or repotting necessary—just place your tree and enjoy its elegance year-round. Faux olive trees are versatile in design, blending seamlessly into a variety of home styles, from rustic farmhouse to modern minimalist.
Assembling Your Faux Tree
 Before you begin shaping your faux olive tree, it's important to assemble it properly. This will ensure a sturdy, realistic-looking tree that can stand proudly in your space.
-
Unbox Carefully: Upon receiving your faux tree, carefully remove it from the packaging. Be mindful not to bend or crush the branches or leaves during the unboxing process. If your tree comes in separate parts, such as a trunk and branches, begin by attaching the branches to the trunk according to the provided instructions. For most faux trees, the branches will click or twist into the trunk. Ensure that each piece fits securely.
-
(If Necessary) Set the Tree in its Pot: Many CG Hunter trees come with their own pot or planter. If your tree is not pre-planted, carefully insert the tree into your chosen planter. It's best to use a heavy, sturdy pot to prevent tipping, especially for larger trees. A decorative planter that complements your interior style can enhance the look, adding to the tree's overall aesthetic.
-
Follow the Numerical Guide: Each CG Hunter artificial olive tree that needs assembly will include an assembly guide. This guide corresponds with easy-to-follow stickers. Simply point the corresponding numbers towards each other and slide the branches into place.
-
Check for Stability: Ensure that the tree stands firmly in the pot. If your tree feels wobbly, consider filling the bottom of the planter with some weight, such as pebbles, stones, or sand, to provide additional stability.
-
Position Your Tree: Once your tree is securely assembled, find the ideal location for it. Faux trees do best in spots where they can stand out, such as next to a sofa, near a large window, or in an entryway. However, placement will depend on the size of the tree and the space available in your room. For larger spaces, consider placing the tree on a plant stand to add extra height, as this helps the tree fill more space and gives it an elevated, impressive presence.
Pro Tip: If you suspect you may need to disassemble your tree (e.g. moving), take a photo of the whole branch before removing any stickers so you'll be able to easily identify them later.
Shaping Your Faux Tree
Now that your faux olive tree is assembled, the next step is shaping it. This is a crucial part of making your tree look as realistic and vibrant as possible. Here’s how to shape your olive tree for different spaces.
1. Start at the Bottom: Base Shaping
When shaping your faux tree, always start from the bottom and work your way up. Begin by adjusting the trunk and lower branches to create a stable and natural base. If your tree has an exposed trunk, bend it slightly to add a little curve, which mimics the look of a real olive tree. For a more sculptural appearance, slightly twist the trunk or adjust its direction to create a fluid flow from the bottom up.
2. Fluff the Branches
Faux trees often arrive with compressed branches, so one of the most important steps is to fluff out the branches. Start with the lower branches and work your way up. Gently spread the branches out, bending the stems to create a full and natural look. If your tree has olives, make sure they are well distributed throughout the branches to avoid clumping.
For the most realistic appearance, focus on creating layers of branches that look dense and lush. Use your hands or a soft tool (like a wire hanger or plant shaping tool) to adjust the foliage and spread it out evenly.
3. Focus on the Top
Once you’ve shaped the base and lower branches, move to the top of the tree. For tall faux trees, slightly bend the topmost branches to create a natural look. Avoid making the tree too “perfect”—a little asymmetry will give it a more organic, real-life appearance. If your tree is very tall, consider rotating the top branches slightly for balance.
4. Shape for Different Spaces
Shaping your tree will vary depending on where you’re placing it. Here are some tips for shaping your faux olive tree based on room size and ceiling height:
-
-
Large Spaces: In large spaces with high ceilings, opt for a fuller, more spread-out look. Use a wider stance and adjust the branches to fill out the entire tree. You can also use a taller planter to emphasize the height of the tree. The fuller the tree, the more it will fill the space and draw the eye up to the high ceilings.
-
Slim Spaces: If you're working with limited space, such as a narrow hallway or a corner, you’ll want to shape your faux olive tree to fit comfortably. Slim the branches to make the tree more vertical and avoid overcrowding. You may also want to trim the branches slightly to ensure the tree doesn’t protrude too far into the walkway.
-
Tall Spaces: For rooms with tall ceilings, choose a tall faux olive tree to emphasize the vertical space. Shape it to be fuller at the base, with gradually tapering branches toward the top. Adding height through a decorative planter or placing the tree on a plant stand is a great way to fill tall spaces effectively.
-
5. Rotate and Adjust Periodically
Don’t forget to rotate your tree occasionally. This is especially important for trees that are placed near windows where one side may face more light than the other. Rotating your faux olive tree ensures all angles look fresh and that the foliage stays evenly shaped. Over time, you may need to readjust the branches as they settle into place.
Additional Tips for Shaping Your Faux Olive Tree
-
-
Use Natural Light: Position your tree near a window or a source of natural light. Although faux trees don't need sunlight, natural light enhances the tree’s appearance and highlights its texture, making it look even more lifelike.
-
Don’t Overcrowd: Give your faux olive tree enough room to breathe. If you're placing it next to furniture or other plants, ensure there’s space around it so it doesn’t feel cramped.
-
Clean Regularly: Faux trees tend to collect dust, so it's important to clean the leaves periodically. Use a gentle cloth or duster to remove dust and keep the foliage looking fresh. If your tree has detailed olive leaves or delicate branches, be extra gentle when cleaning.
-
How to Make Your Faux Tree Look Even More Real
@theantoinettefm @CG Hunter does it again 😍! I’m in love with this willow tree and it comes with the planter! Their trees are 15% off 🎉! #diningroomdecor #neutralhomedecor #cghunter #emptycornerstyling ♬ UNSTOPPABLE EVENING - finetune
For additional tips on making your faux olive tree look more real, you can take inspiration from experts in the field. According to Jenny Komenda, adding a bit of greenery around the base of your tree can also enhance its natural look. If you want tips on how to add moss to your artificial tree, check out our journals - Styling the Magnolia Tree with Moss (Featuring Chase Hill) and Adding Moss to Your Faux Plants. Incorporating some moss or real soil can help hide any base imperfections, making the tree look even more lifelike.
Additionally, Almost Makes Perfect suggests focusing on the overall shape and ensuring that the tree doesn’t look too “perfect.” A little asymmetry goes a long way in making the tree appear more authentic.
Bring Your Olive Tree to Life
Shaping and assembling your faux olive tree may take a bit of time, but the results are well worth it. With the right assembly, shaping, and placement, your tree will become an elegant focal point that enhances any room. Whether in large or slim spaces, or even in tall areas, a well-maintained faux olive tree can bring timeless beauty and sophistication into your home.
Explore CG Hunter’s collection of faux olive trees and other artificial plants to find the perfect addition to your home. Our lifelike, premium pieces are available here and on Amazon.
Follow CG Hunter

Stay up-to-date with our latest collections, sales, and home styling tips by following us on Instagram, Pinterest, and TikTok. We’re always sharing inspiration to help you make your home a beautiful, inviting space.