A Complete Reference for Assembling, Fluffing, Rotating, and Maintaining Your Tree so it Reads as Architecture, not Décor
A faux tree is not finished when it leaves the box. The shaping is the design work. The piece arrives compressed for transit, and the difference between a tree that anchors a room and one that looks like a placeholder is almost always in the half hour spent opening it up. Most people skip that step. They unbox, position, and walk away. The tree is then judged on its worst possible silhouette.
This guide treats shaping as a discipline, the same way an upholsterer treats a frame or a stylist treats a shelf. The goal is not to make the tree look full. The goal is to make it look intentional, and that requires understanding how to assemble it, where to place it, how to rotate it, and how to keep it pristine over time. Used well, a faux tree functions as architecture in a room. It defines a corner, holds a sightline, and softens hard surfaces without ever asking for water or light.
Why Shaping Is the Most Underused Step in Faux Tree Styling

Faux trees ship compressed because they have to. Branches are tied close to the trunk, leaves are folded inward, and the whole form is wrapped to survive freight. This protects the materials, but it also means the tree leaves the warehouse looking nothing like its final shape. What arrives at the door is a closed silhouette. What belongs in the room is an open one.
The most common mistake is treating the tree as finished on day one. A tree that looks sparse is almost never a sparse tree. It is an unshaped one. Manufacturers design these pieces to be considerably fuller than they appear out of the box, with branches engineered to bend, hold, and layer. The foliage volume is there. It just needs to be released.
From a design perspective, this is the same principle that applies to a slipcovered sofa or a linen drape. The piece looks unconvincing until it is properly worked. With a faux tree, that work is mechanical, deliberate, and worth the time.
How to Assemble a Faux Tree (Step by Step)
Most CG Hunter trees ship in two or three sections that fit together at the trunk. Assembly is straightforward, but a few details determine whether the final form looks structural or wobbly.
- Unbox in the room where the tree will live. Faux trees are lightweight when assembled but awkward to carry once shaped. Working in place avoids re-fluffing branches that catch on doorways.
- Identify the base, the middle section, and the crown. The base typically holds the trunk in a weighted pot. Lift each section by the trunk, never by the branches.
- Slide each section onto the central rod or pole. Most trees use a friction-fit joint. Push down with steady pressure until the seam closes. A visible gap at the joint is the most common cause of a tree that looks unstable, even when it is secure.
- Leave any internal dowels, ties, or support wires in place. On certain pieces, including the 5' Artificial Monstera Tree, the dowel and ties hold individual leaves in their natural cantilevered position. Removing them collapses the silhouette permanently.
- Confirm the trunk is plumb before shaping. A tree that leans even slightly will read as wrong no matter how well the foliage is shaped afterward.
How to Shape a Faux Tree for Realism (The Bottom-Up Method)

Shaping always works from the inside out and from the bottom up. This mimics the way real trees grow, with lower branches extending outward and upper branches reaching toward light. Shaping in any other order produces a top-heavy or geometric silhouette that reads as artificial.
Start at the lowest branches. Pull each main branch away from the trunk, then separate the secondary stems off that branch, then open each leaf or leaflet individually. The work is repetitive, not difficult. Bend stems gently in slightly different directions so no two leaves sit at the exact same angle. Real foliage is asymmetrical. The eye reads even tiny variations as natural.
Move up the tree one tier at a time. As you shape, occasionally step back six to eight feet and look at the silhouette from where the tree will most often be seen. Adjust for any flat spots, gaps along the trunk line, or branches that crowd one side. Rotate the tree on its base if needed to identify a clear front.
The top tier is where most people stop too early. Crown branches need the most attention because they shape the tree's profile against the wall or ceiling. Pull these outward and upward, never down. A faux tree shaped well at the crown looks alive. A faux tree with a crown left unshaped looks like a hat.
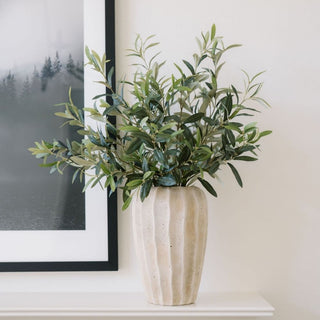
For trees with a wire armature in the leaves, like an Artificial Olive Tree, individual leaf bending is what creates realism. Spend the most time here. For trees with molded leaves, like a fiddle leaf or rubber tree, the work is at the branch level, with each branch positioned to clear its neighbors and catch light independently.
How to Make a Faux Tree Look Fuller Than It Did Out of the Box
Fullness is rarely about adding anything. It is about extending what is already on the tree.
The first move is horizontal. Pull each branch away from the trunk until it reaches its natural extension. Most branches can rotate forty to ninety degrees outward without strain, and the apparent volume of the tree increases dramatically once they do. The second move is vertical layering. Stagger the angles of branches at each tier so foliage at one level fills the gaps at the level above and below. The third move is what designers call the negative space pass. Look for any place where the trunk shows through unintentionally. Reposition a branch from a denser zone to cover that gap.
For a tree that still feels short of its potential, a riser inside the planter raises the trunk and reads as additional canopy height. A flat block of foam, an inverted nursery pot, or a sturdy dish under the tree's internal pot gives instant lift without altering the piece itself. This trick works particularly well for rooms with nine-foot or ten-foot ceilings, where standard tree heights can read as undersized.
How to Find the Right Front of the Tree for Your Space

Every faux tree has a best face. Identifying it before final placement saves significant rearrangement later. With the tree assembled but not yet fully shaped, slowly rotate the trunk through a full turn. Look for the side with the densest, most balanced branch distribution. That is the front.
Then consider the room. A tree placed in a corner needs its front oriented toward the primary sightline, usually the seating area or the path of approach. A tree flanking a fireplace or doorway needs its fullest face turned toward the room, with the sparser side tucked toward the wall. A tree in the center of a space, such as an entryway pedestal arrangement, needs balanced shaping on all sides because every angle becomes a front.
When and How to Rotate a Faux Tree
Rotation is the maintenance step almost no one performs, and it is the one that protects the tree's longevity in the room. A quarter turn every two to three months prevents two things: dust accumulating disproportionately on the side facing traffic, and any minor branch settling that occurs from gravity alone over time.
Rotation also refreshes the room visually. The same tree, turned ninety degrees, presents a slightly different silhouette and reads almost like a new piece. For trees positioned near windows, rotation prevents any one side from receiving more indirect UV exposure than the others, which extends color stability over years rather than seasons.
How to Clean and Maintain a Faux Tree

Faux trees do not need watering, but they do collect dust. The schedule is light: a quick dust every three to four weeks, a deeper clean once or twice a year.
For routine dusting, a soft microfiber cloth or a feather duster works on most leaf surfaces. For larger trees and dense foliage, a hairdryer set to cool and low is faster and more effective than wiping leaf by leaf. Hold the dryer twelve to eighteen inches from the foliage and work top down. Compressed air, the kind sold for keyboards, reaches into tightly clustered leaves where cloth cannot.
For deeper cleaning, dampen a soft cloth with lukewarm water and wipe each main leaf surface. Avoid soap, sprays, or commercial leaf shine products, which can dull the matte finish that makes high-quality faux foliage convincing in the first place. Let any wiped foliage air-dry fully before re-shaping.
Trees positioned near kitchens or fireplaces need cleaning more often, because cooking residue and soot bind to leaf surfaces in ways household dust does not. For these placements, a quarterly damp wipe is worth scheduling.
How to Style a Faux Tree as Architecture, Not Decoration
A well-shaped tree is the structural piece in the room. It frames a window, anchors a corner, or breaks up a long wall the way a column or built-in would. The styling around it should reinforce that architectural role, not compete with it.
A single statement tree in a quiet corner is almost always more powerful than three smaller ones spread around the room. Two trees flanking a fireplace, doorway, or bed create bilateral symmetry that reads as deliberate, like trim or sconces. Curated Sets are available for pairings like this when matched height and form matter for symmetry.
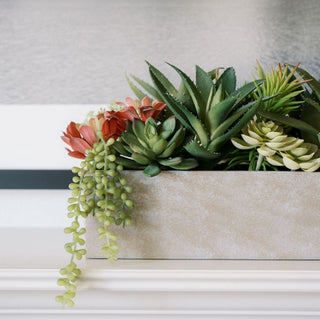
Pair the tree with a planter that grounds it materially: a stone, terracotta, or patinated metal vessel that adds weight to the base. Avoid undersized planters, which make even a perfectly shaped tree look top-heavy. The base of the planter should feel like it could hold the tree's mass even if the tree were real.
Designer Answers: FAQ on Shaping and Styling Faux Trees

Q: How long does it take to properly shape a faux tree?
A: Plan on twenty to forty-five minutes for most trees, depending on size and density. A 7' olive tree with hundreds of individually shaped leaves can take longer. The time invested at setup determines how the tree reads for years afterward.
Q: Can I remove the dowels, wires, or ties inside the tree?
A: No. Internal dowels and ties are structural and hold the canopy in its designed shape. Removing them often causes leaves and branches to droop in ways that cannot be reversed. Adjust around them.
Q: Why does my faux tree look sparse even after shaping?
A: Almost always because shaping started at the top instead of the bottom, or because branches were not pulled outward to their full extension. Re-shape from the base up, prioritize horizontal extension, and reassess.
Q: How do I make a 6.5' tree look taller in a room with high ceilings?
A: Place a flat riser inside the planter to lift the trunk three to six inches and shape the crown branches upward and outward rather than horizontally. Both moves add visible height without changing the tree itself. If you're nesting your tree into another pot, you can try hiding the riser inside the pot for a lower profile adjustment.
Q: How often should I clean a faux tree?
A: Light dusting every three to four weeks, with a deeper clean once or twice a year. Trees near kitchens or fireplaces benefit from quarterly damp wiping.
Q: Can I shape a faux tree that has been in storage for a season?
A: Yes. Trees stored compressed will need re-shaping when reintroduced. Work bottom up as if assembling new, and allow extra time for branches to relax into position.
Shaping as a Design Discipline
The most considered homes are not the ones with the most greenery. They are the ones where each piece has been worked to its full potential. Shaping a faux tree is the small, repeatable discipline that turns a product into a fixture, a fixture into architecture, and architecture into the quiet backbone of a room. Half an hour of attention is the difference between a tree that performs for a season and one that performs for a decade.
For more on placement and proportion, read our companion guide on how to shape a faux tree for large, slim, and tall spaces and our walkthrough on assembling and shaping your olive tree. For weekly design guidance, follow the Designer Journal and our Substack, and find us on Instagram, Pinterest, and TikTok at @cghunterhome.